Shaders are go!

Hi everyone so for this week i took a break from my usual asset development to try my hand at the creation of some custom shader’s for use with our game, a shader is what is used to render the game world and essentially for this i will be creating a material system that piggy backs onto the UE4 camera shader and renders the effects I’ve created , To begin this process i talked with one of the Lecturers at my college and he gave me some good examples on were to start.

For this shader i attempted to recreate a VHS style Static screen, i was actually astounded when i was reading on the UE4 documentation site to discover a tutorial that very closely does what i am attempting to create, example below of current shader.
ShaderExample
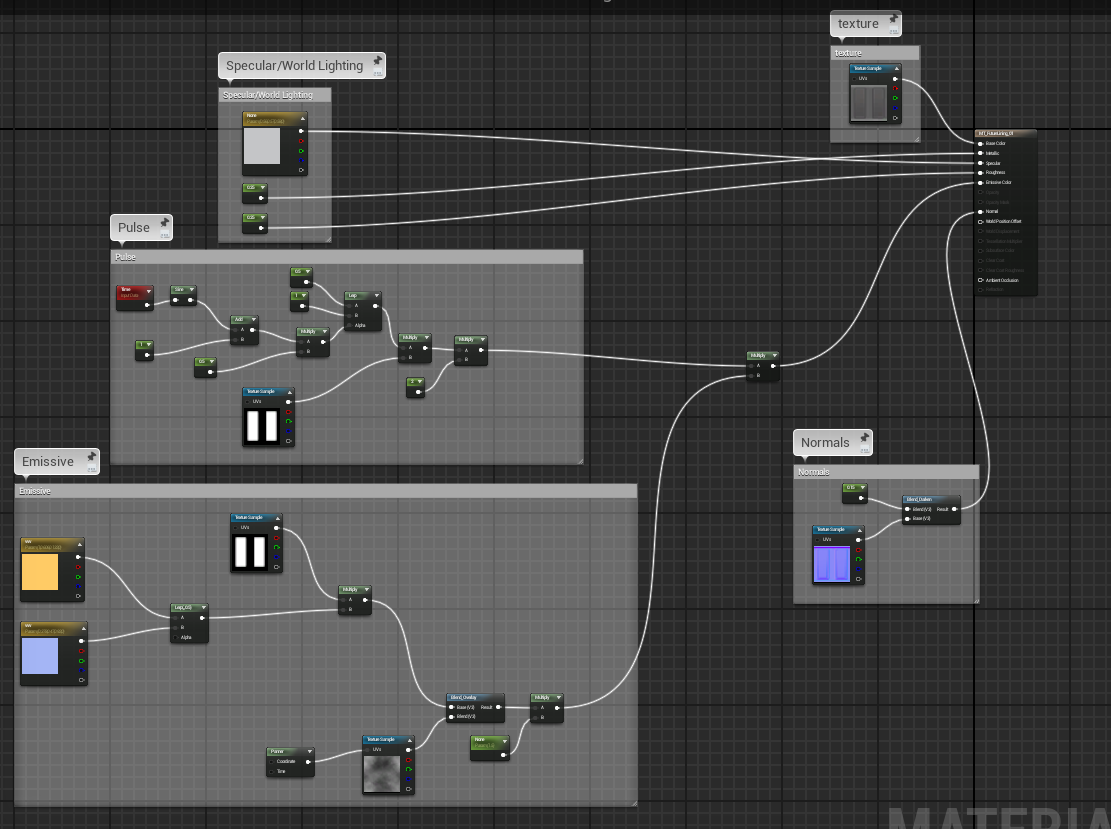
This was created using UE4’s node based material system and i am so far very happy with the results, their are still some problems with it that need addressing though which i have not figured out yet, For one the shader does not render particle effects and the current suggested workaround for this completely breaks the shader, Example below.

Broken ShaderAs you can see the shader is now rendering out completely incorrect to what i want (pretty cool looking though, kinda like the camera effect from outlast), however it now renders particle effects, I am not entirely sure how this works however from what i understand it is due to how the scene’s layers are rendered.

The idea behind this shader is that it will be present whenever the player takes damage, and it will increase in fluctuation when the player is close to death. For fun i want to try and add a sobel edge effect ontop of this shader to try and give the world a more cartoony feel to it and less serious, I am very happy with what i have got so far and would like to try and use this shader effect for use in other projects later.

Hope you have enjoyed reading.

This week in map stuff

Hi everyone!, over the past week i have spent most of my time doing minor changes to the map, most of these being changing the length of lanes and other such things to allow for the implementation of assets into the level, as well as this i have begun creation of textures and unwrapping models for texturing, with my textures they’re mostly just basic colors and shapes with some added noise to make them more visually interesting, then when i am happy with the base texture i create a normal map using an Nvidia plugin that can generate a normal map and then i edit this partially to get the desired effect.

Below is an example of the textures i have so far created along with their normal maps and specular maps, the normals maps are used to give the effect of 3D and the specular maps are used for the engine to figure out how to properly light the texture, Their is also an option within Unreals material editor to let me create a specular just using the blueprinting system, for this project i have tried a combination of both to try and get some cool looking lighting out of the textures.

TextureSheetAfter i have create the textures,normals and sometimes speculars i then take it into UE4 and begin creation of the material, depending on what i want this can be either a very straightforward process of a bit of a tricky one, For instance the below gif is a material that i have created entirely within UE4, none of this has been animated within another program.

MaterialEffect

In order to create this effect i had to create several different nodes, within the emissive area which gives it a glow effect when rendered in game i also have a cloud texture that i quickly made in Photoshop using the cloud filter which i am overlaying on top of the colors and then panning to the left.

Within the pulse section of the material i have set it up to occasionally make the material glow slightly brighter than what it is default set to by the emissive, Above this is the specular map input which also contains two variable which are plugged into roughness and metallic which further help to make it feel like a real object in the scene.

Above that their is also the default material that is overlayed on top of everything else and then also the normal map which is used to give it the pretend effect of 3D lighting.

MatExampleSo other than all that stuff which i have greatly enjoyed doing i have also been slowly optimizing and unwrapping my 3d models that are already in the scene to be ready for when i texture them.

Hope you’ve enjoyed reading and tata!.

Hi everyone here is another update on how the map is going, currently I have created multiple assets to populate the scene with, the major parts being Huge pipes which i guess would be used to transport sewage,water or house electrical cables for connection between the higher and lower part of the city, Below is a gif of a brief fly over.

MapFlyOver

Mostly i have been working on trying to make sure the pipes phase in and out from top to bottom using either fog or at the top of the level a massive block, which is meant to represent part of the unfinished city, Originally i was going to use a volumetric fog to cut off both the top and bottom, however currently their is no such tool in UE4 to allow me to do this eventually i will try and create a fog particle effect to try and block out the upper sections.

I also had help from one of the lecturers who helped me improve some of my already completed assets and i plan on creating some basic textures for the level so that we have something more tangible to show off for a presentation that is coming up soon on the project.

As well as all this both myself and another class mate have begun designing what the HUD will look like, below you can see the most current design for the HUD, it has to show all three placeable towers, the players crossbow as well as a wave counter and a bolt counter for the player, We decided to position it at the top center of the screen instead of the bottom as having the HUD and the crossbow in the same section of screen space would be to confusing for some players.

HUD

Aside from all that i haven’t been doing much else, i look forward to mocking up some textures for the level and seeing how that goes as i always enjoy creating assets, anyway hope you’ve all enjoyed the read and ill see you next time.

Gratuitous mappernating

Hi everyone!

So our group has chosen to create a First person tower defense shooter, similar to Sanctum 2, For this i have chosen to do level greyboxing as well as HUD design, for the HUD i will be using UE4’s new UI tool, it’s really simple and allows you to very quickly block out the beginnings of what you want your HUD to look like.

Our game is set in the future were a Medieval engineer has traveled into the not to distant future and must defend himself from hordes of robots, He must do this by using his wit as an engineer to modify the available technology surrounding him.

For visual reference i have been using thing’s like Akira, Ghost in the Shell,Kowloon city, Deus ex human revolutions China map, Remember Me as well as Judge Dredds mega city one, My vision of the level in its complete stage is to create something akin to a heavily built up and eroded city that is still lived in, some great reading material for this is also Neuromancer and Snow crash, A great piece of reference that can be pulled from as well is Kowloon city almost a real world counter part to what i have stated above.

So with all this stated for the moment all i have been doing is the block outs for our level so Haigen our programmer can have something to work with, I have created four different versions of the map and currently the fourth one that i have come to appears to be the one we will stick with.

MapCurrently their are three lanes, enemy waves will spawn from these and converge at the same point, Eventually i plan on filling the negative space with smaller pathways that the player will be able to use to navigate easily from each lane to the next, Visually this will look like a built up industrial section of the city which people still live in.

Other than this i have been working slowly on a small side project, All it is at the moment is a relaxing exploration game were you sail a ship around to different islands, their are currently a lot of games focusing around this genre though so i think that i will change it up somewhat.

Bye!.

Moving along

Today i’m going to update you on my progress about how the map is going, for one thing I’ve been working on more models and if you look below you’ll see some of them with captions so they actually make sense, I’ve also been trying to figure out how to add rain to my map, it’s more difficult than it sound’s but i think i’m nearly there with it, and last but not least i’ll show you some of the textures I’m using and show you some normal maps.


The the air vent to the left you can see it is fully textured but some of it has stretched i’m going to go back and fix this if i have time but most people probably wont even notice, and for the wall panel to the right i have not started texturing but will be doing them shortly it’s going to be scattered around the map to make things feel busy.

For those of you who don’t know what a normal map is it’s pretty much a way of making a low poly model look amazing, what it does is add a sort of 3d effect on the 2d texture by raising certain colors within the files RGB (red,green and blue Example below) basically it goes and applies the RGB to the x,y and z coordinates of the map to give it that 3d effect, pretty cool yeah.


This example is of a texture not a 3d model but it gives it the feeling of 3d doesn’t it? what this does is make it use up less processing space than  actually covering the floor of the map with real models as that would be very intensive to the player’s computer and slow them down far to much to enjoy themselves.

Completed model

Ok so I’ve completed my first model, i think it turned out okay, the first image is the completed model and the second image is the texture i used to cover the model with, if you’re wondering why the texture looks so damn funny it’s because when you complete the model Maya allows you to unwrap it  into a bunch of separate flat pieces on a grid you can then export this mesh to an image and open it up in Photoshop.

The two blue pieces of metal at the bottom of the image are the top and bottom of the cylinder and the hazard line is the skirt at the bottom, if you’re wondering how i made this model i’ll tell you, what i did was get a bunch of free texture files from http://cgtextures.com/ (it’s a great website) then i chucked them into the Photoshop file which contained the wire mesh for my model and i placed the bits and pieces i needed where i wanted them, some of them are overlaying rust images with transparency on, The blue metal was originally a more silver color but i messed around with it’s hue/saturation and curve to give it a more blue look,  i’m not the best at photoshop but i think it came out very well.

Hope you all enjoyed this, Finn

Bit of a late one

Okay so i haven’t updated in awhile, apologies for that, as i haven’t really had a lot to talk about all i’m really doing now is getting the finishing touches on my grey box and, started modeling, it’s nothing fancy so far but i’ll show you a few images of what I’ve been working on below.

If you noticed the file name you’ll find that it’s called a “power_cylinder” (amazing i know) i didn’t really know what i should call it, i knew that is looked like it emitted power and it was a cylinder so hence the name “power_cylinder”  at the moment you’ll see it’s only have textured as in theirs only a bit of hazard tape that circles the bottom of the model, but not to fret i will be adding more shortly.

As you can see from the image above i have captioned most of what is going on in this image, if you’re wondering why their is rocket launcher ammo smack dab in the middle of the map i’ll tell you, it’s because the rocket launcher can be very over powered if used correctly and i wanted to limit this by putting it in a very sparse area of the map, the map itself also makes the rocket launcher hard to use as it has very small interiors and firing a missile could be just as beneficial as it could be deadly as you may find out very fast that firing a missile at someone behind a pillar could blow you up instead of the enemy.

If you’re wondering why this map looks so different from what the the illustrator sketches that i uploaded look like it’s because this is the second iteration of the map in this version i removed the bottom tier level and squished everything together as i found out very quickly from my friends that the map was to large and people didn’t enjoy spawning and then having to run all the way to the other side of the map to then maybe get a few kills and then die and have to run all the way back again, No in this version you spawn and are pretty much instantly in the battlefield, this makes for a much more fun map as player versus player combat is sped up.

That’s all I’ve really got to say for the moment and if you’re getting bored with all my stuff about map’s then not to worry later on i will be talking about a boardgame that we are designing in the course.

-Finn

My map so far

Today i want to talk to you about my grey box, in my first post you would have already read about what a grey box, but in case you missed my first post and don’t want to read it then i’ll remind you, a grey box is the first stage of the actual map development (as in the bit were you hop into the map editor and start building it not the bit were you draw it on graph paper or use illustrator and graph paper) and so you’re probably thinking that at this stage i would need to have my art assets and what not ready but luckily i don’t (actually need to have them ready) because they come later in the third stage of development but ill talk about that later, So in this stage of development all the map needs to be able to do is be playable, it doesn’t need any fancy models or effects to make the player think “wow this is one hot map” instead all i do is make as a bunch of plane brushes nothing fancy needed!.

Yeah that’s the greybox. amazing ain’t it?

I beileve the grey box is almost complete but you’re all probably thinking to your selves “hold on that’s only half a map” well then i’d have to say that you’re spot on because this is a symmetrical map and that means that i only have to build half of it then copy paste, oh man does that make map design easy, now of course this can only work with certain games, you couldn’t really have a symmetrical death match map in the half life 2 single player campaign could you? (well you could but it wouldn’t accomplish much.)

Another image of the grey box with a placeholder light and armor pickup.

So now if you’re wondering why there are weapons in my map it’s because i need to test it, the tests being something along the lines of does this weapon make the player overpowered in this area of the map? or does this armor make the player to strong if i place this armor to close to the starter position.

But yeah just things like that, that i have to take into consideration for the final design of my map.

Finn signing out.

Apple

Welcome readers!

Yesterday in the course we had a lesson in using Maya which is an autodesk program that allows you to build 3d models and apply different effects to them some of these being muscles,lights,fur,cloth and many others, The first model we had to design was an apple (get it cause i called the post “Apple”).

This model is made from three seperate polygon shapes

  • Sphere (the apple)
  • Cylinder (the stem)
  • and a Plane (The leaf)

To get the shape of the apple all i had to do was change it to a vertex, vertexes allow me to edit specific points on the shape and move them about, in this case i selected to bottom half and made it slightly smaller and longer, i then selected the top half and shortened it slightly, this allowed me to give it the shape of a perfect apple, as for the material (which is the skin of the model) all i did was get an image of an apples skin and applied it to the model.

For the stem that is a cylinder which has been extruded, extruding allows me to make a copy of a selected surface and have it still connected to the previous cylinder,this allowed me to then pull the extruded cylinder up and then move it slightly to the left(i did this with several different extrusions  to give it the shape that i wanted.

Lastly for the leaf what i did was make a Plane (Think of it as an A4 piece of paper) and then applied a leaf.png, the png file actually has a black background but Maya has a feature which you can use to remove all black from an image (Now its an A4 piece of paper which has a leaf drawn on it and then cut out,) Then all i did was rotate the plane a little, place it on the stem and then i used the vertex edges on the plane to give it some dimension.

Toodles.